HOW TO INSTALL WINDOWS XP FROM A FLASH DRIVE
(Should be 4GB or less for it to work)
This tutorial shows a detailed step-by-step method on HOW TO INSTALL WINDOWS XP FROM A FLASH DRIVE.
FOLLOW THESE STEPS TO MAKE A BOOTABLE WINDOWS XP USB FLASH DRIVE:-
(If you can`t see a screen properly, open it in a new tab to see it at full size)
Step #1 on How to install Windows XP from a Flash Drive
Preparing The Flash Drive
Before beginning, you need to make sure that the computer you plan to install Windows on can boot from USB. Check your BIOS or motherboard manual if you are unsure of this. You will also need a separate computer to prep the installation on the USB flash drive. You will need a flash drive at least 2 GB in size. Flash drives are extremely cheap so buying one shouldn't be a problem if you don't already have one this size or larger.
The first thing you need to do to use this method to install Windows XP from a Flash Drive is to download the three files below and save them on your desktop:
• PeToUSB.zip
• USBprep.zip
• BOOTsect.zip
THESE THREE FILES HAVE BEEN PACKED IN A SINGLE ARCHIVE. DOWNLOAD LINK IS AVAILABLE AT THE END OF THE POST. YOU WILL NEED THESE FILES TO INSTALL WINDOWS XP FROM A FLASH DRIVE.
Once you have these downloaded, extract
PeToUSB.zip and
USBprep.zip separately. (This can be done with
Winrar). Then, copy everything from the
PeToUSB folder to the
USBprep folder. Now, copy the
USBprep folder and place it in C:\
Also, extract BOOTsect.zip and put these files directly in the C:\ directory as well.
Next, you need to put your Windows CD in your optical drive and copy all of the contents from it over to a folder in the C:\ directory. I named mine "XP" so it would be easier to recall later.
BOOTMGR IS ALSO THERE BUT ITS HIDDEN
Navigate to the USBprep folder in C:\ and double click the usb_prep8.cmd file (yours may or may not have the .cmd extension based on the Windows settings you are using. You can enable file extensions by clicking Tools, Folder Options, View tab, then deselecting "Hide extensions for known file types" in the Advanced Settings list).
Clicking usb_prep8.cmd opens up the black and white command screen you see above. Follow the directions on-screen by clicking any button and you will be greeted with another window, PeToUSB. If you have your flash drive plugged in, the program should detect it and list it under the destination drive.
Click "Start" in the PeToUSB window, select "Yes" to continue then again click "Yes" when it asks if you are sure you want to repartition and format the disk. Once complete (TAKES SOME TIME), click "Ok".
Leave all of these windows open and go to "Start", then "Run" and type in "cmd" to bring up the console window.
Type "cd c:\", without the quotes and press Enter.
Now type "bootsect /nt52 E:", without the quotes. In this example, "E" represents the letter of my flash drive. Yours will likely be different so be sure to check beforehand (it should be listed beside your device name in PeToUSB - if not there, simply double click My Computer on your desktop and locate the drive letter there.) then press Enter.
The command window will inform you that Bootcode was successfully updated on all target volumes.
Now, close out of the current command window and also close PeToUSB. Doing this will bring up a new set of options in the original command window, as seen above.
Press "1" then Enter and you will be asked to browse to the folder that you copied Windows to. Select the folder then click "OK".
Click back on the command window and press "2" then Enter. You will be asked to enter a drive letter that is not already taken. You may want to check in My Computer to be sure you select a letter that isn't already being used. In the screenshot above, I selected "V". Press Enter after selecting your drive letter of choice.
Press "3" then Enter and you will be asked for the drive letter of your flash drive. This is the same letter that you used earlier in bootsect. For me, that letter is "E". Input the letter and press Enter.
Finally, press "4" then Enter. You will be asked if you want to proceed with the format. Type "Y", then press Enter.
The system will pause a moment while the format takes place. Then you will be asked to press any key to continue... do so. This starts the first phase of the process which will take a few minutes.
Once again, you will be prompted to press any key to continue... do so. Another dialog box will pop up, asking you if you want to start the file copy. Click "Yes". The command window will again activate and start copying files to the flash drive which will take a few minutes.
After a bit, you will be asked if you would like USB-stick to be Preferred Boot Drive. Click "Yes".
Finally, a dialog box asks if you would like to unmount the Virtual Drive. Click "Yes".
That's it, you are done! You can close the command window and any other relevant windows that may still be open.
But, we are not done. Now comes time to install XP, which as you will find out, is a bit of a different process when using a flash drive. Continue ahead as we walk through this procedure.
Step #2 on How to install Windows XP from a Flash Drive
Once you have your flash drive loaded with XP, it's time to install it. As mentioned earlier, you need to be sure that your computer supports booting from a USB drive.
Plug in the flash drive then turn on the computer and go into the BIOS (usually by pressing the Delete key at the POST screen). In the BIOS, you will need to set the flash drive as the first boot device, usually called something like "USB Hard Drive". Save and exit to reboot the system.
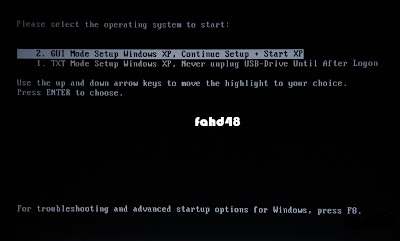
You will be greeted with the screen you see above which gives you two options: TXT mode or GUI mode. Select TXT mode for now.
Setup will load as normal, but there is one catch that you need to be aware of here. If you are formatting your hard drive and creating a new partition, you will need to turn off the computer immediately after the partition has been formatted (before Windows starts copying files over). Turn the system back on, boot back into TXT mode then direct Windows to leave the current file system intact. This is done because the flash drive can't copy to the new partition unless the computer is restarted and the flash drive is allowed to recognize the new partition. Strange, yes, but that's just how it works. If you aren't creating a new partition, then just carry on as usual.
Once all of the setup files are loaded, the computer will reboot. This time, select GUI mode and continue your installation as you normally would with a CD. It is important that you don't remove the flash drive until you are totally finished with the installation or you may corrupt the install and have to start over again.
This guide should allow you to quickly and easily install Windows XP on a computer without an optical drive such as a netbook. You can, however, use this method on any computer to speed up the installation process, as it is much faster to install from a flash drive versus an optical drive.
TOOLS REQUIRED FOR MAKING BOOTABLE XP FLASH DRIVE
The tutorial was originally done by FAHD48. He gave me permission to share this tutorial with everyone. So, do not forget to thank him in your comments. He did everything in this tutorial, I`m only sharing his work.
The tutorial on How to Install Windows XP from a Flash Drive is complete. However, I have selected some of the "problems/misunderstanding" that other people who used this method encountered, along with their solution/clarification from FAHD48. Here are some of them:-
Problem #1 encountered on How to install Windows XP from a flash drive:
Problem:
the command "bootsect /nt52 D:" gives me
'bootsect is not recog as an internal or external command, operable program or batch file.
Advice:
bootsect<space>/nt52<space>E:
make sure u type in the correct format...
if problem still persists it means you did not follow the step corectly.
the above problem arises when you try the command on an unformatted (should be formatted by PEtoUSB) flash drive
Problem #2 encountered on How to install Windows XP from a flash drive:
Problem:
formatting with PeToUSB gives me error when its about 90%
FormatEx Error[11]: An Error Occurred Formating the Drive.
Advice:
that must be because of a faulty flash drive
Problem #3 encountered on How to install Windows XP from a flash drive:
Problem:
can I use a memory card instead?
Advice:
plug in your memory card first and reboot , see if it is shown in boot options at startup.
if yes, then u can use it otherwise not.!! Normally, it`s not possible, but you may try
Problem #4 encountered on How to install Windows XP from a flash drive:
Problem:
How can I be sure if my motherboard supports booting from USB?
Advice:
go in bios settings and see if there is listed an option as 'flash drive' or usb device in boot priority options.
another way is at startup screen mostly there is an option named boot menu or boot option. plugin in your flash drive and then at that screen see if yur flash drive is listed in there. if it is then your motherboard supports booting from flash drivers otherwise not.
Problem #5 encountered on How to install Windows XP from a flash drive:
Problem:
Can i install windows xp sp3 over Windows 7 using this method?
Advice:
yes you can but do so in a different drive than windows 7 (but after installation windows 7 boot option will not be there). so if u want dual boot option install easyBCD on your XP to get the dual boot option so YOU can boot into 7 or XP at your will.
Problem #6 encountered on How to install Windows XP from a flash drive:
Problem:
would an ipod touch work?
Advice:
i wouldn't recommend that as during the process the removable media is flashed (formatted) so your ipod will lose its OS. instead buy i pendrive, its cheap
Problem #7 encountered on How to install Windows XP from a flash drive:
Problem:
i have a problem when copying to usb.. When you must enter number 4 (copy to usb) , it said error , cannot create virtual drive T
Advice:
make sure the letter T is not already taken by any of your drives. Use a different letter!! And you must be logged as admin.
Problem #8 encountered on How to install Windows XP from a flash drive:
Problem:
when i typed this "bootsect /nt52 E:" in cmd, it doesnt work... and yes i have the right alphabetical letter
Advice:
firstly i have used E in the example because that was the drive letter of my removable drive. Check yours and put that letter there in place of E. If it is E then OK. secondly make sure you copied the contents of bootsect folder(3 files) in root C:\
Problem #9 encountered on How to install Windows XP from a flash drive:
Problem:
i plug my flash drive into my system, but the PEtoUSB doesn`t detect it. i can browse to it normally in windows, but the soft can`t detect it
Advice:
try running it as admin and see if that helps!!
Problem #10 encountered on How to install Windows XP from a flash drive:
Problem:
I keep getting a missing hal.dll error when I go into GUI setup mode
Advice:
you need to first start in txt mode and start in gui mode the second time!!
Well, these were the problems that other people encountered. If you have the same problems, you can have the solution here. And if it cannot be found among these, just through comments.
I hope that the tutorial helped you to Install Windows XP from a Flash Drive properly.
And do not forget to thank FAHD48 for the guide.










 Previous Entries


